US Geek DIY: Craft a Custom Lightsaber for Under $50 in 2025
In 2025, US geeks can embark on an exciting DIY adventure: building a custom lightsaber for under $50, utilizing readily available materials and online tutorials to craft their own unique weapon from a galaxy far, far away.
Are you a US-based geek dreaming of wielding your own lightsaber? In 2025, that dream can become a reality without breaking the bank. With readily available resources and a dash of DIY spirit, you can embark on a US Geek DIY Projects: Build a Custom Lightsaber for Under $50 in 2025, crafting a unique replica of the iconic weapon.
Unleash Your Inner Jedi: The Allure of a DIY Lightsaber
The lightsaber. A symbol of power, elegance, and the eternal struggle between good and evil. For generations of Star Wars fans, the desire to wield one of these iconic weapons has been a constant. While official replicas can be expensive, the DIY route offers an affordable and incredibly rewarding alternative. Why is building your own lightsaber so appealing, especially for the geek community?
The Thrill of Creation
For many, the satisfaction of building something with their own hands is unmatched. The DIY process allows you to personalize your lightsaber, making it a true reflection of your individual style and preferences.
Affordability Meets Creativity
Building a lightsaber doesn’t have to cost a fortune. By utilizing readily available materials and resourceful techniques, you can create a stunning replica without emptying your wallet. This is especially appealing in 2025, where budget-friendly DIY options are more accessible than ever.
A Gateway to Geek Culture and Skills
Embarking on a DIY lightsaber project can open doors to a wider world of geek culture, connecting you with like-minded individuals and expanding your skillset in areas such as electronics, crafting, and problem-solving.

Ultimately, the allure of a DIY lightsaber lies in the combination of creativity, affordability, and the sheer joy of bringing a beloved object from a fictional universe into the real world. It’s a project that embodies the spirit of geek culture: ingenuity, passion, and a willingness to roll up your sleeves and get your hands dirty.
Gathering Your Arsenal: Essential Materials and Tools
The key to building a lightsaber for under $50 lies in smart material choices and resourcefulness. You don’t need expensive, specialized equipment to create a convincing and impressive replica. Let’s break down the essential materials and tools you’ll need for your DIY lightsaber project:
The Hilt: Your Lightsaber’s Foundation
The hilt is the handle of your lightsaber and serves as the housing for the electronics. Here are some budget-friendly options:
- PVC Pipes: Widely available, inexpensive, and easy to cut and modify.
- Plumbing Fittings: Offer unique shapes and textures that can add visual interest to your hilt design.
- Recycled Materials: Get creative! Look for discarded tubes, pipes, or containers that can be repurposed into a hilt.
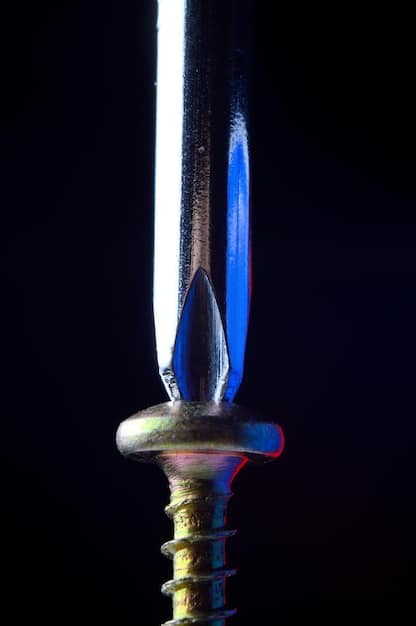
The Blade: Bringing the Light
The blade is what makes a lightsaber a lightsaber. While a true energy blade is still the stuff of science fiction, you can create a convincing illusion:
- Polycarbonate Tubing: A durable and translucent material that diffuses light evenly.
- LED Strip Lights: Affordable and readily available online. Choose a color that suits your personal lightsaber style.
- Diffusion Film: Wrap this around the LED strip to create a smoother, more uniform glow.
Electronics: Powering Your Creation
To bring your lightsaber to life, you’ll need some basic electronic components:
- AA or AAA Batteries: A small battery pack to power the LEDs.
- On/Off Switch: To control the power to your lightsaber.
- Wiring: To connect the components together.
- Resistors: To protect the LEDs from burning out.
Essential Tools: The Maker’s Toolkit
Finally, you’ll need some basic tools to assemble your lightsaber:
- Cutting Tool: A saw or pipe cutter for modifying the hilt and blade.
- Sandpaper: For smoothing rough edges and preparing surfaces for painting.
- Soldering Iron: For connecting the electronic components.
- Hot Glue Gun: For securing components and filling gaps.
- Paint: To customize the color and finish of your hilt.
By carefully selecting your materials and utilizing readily available tools, you can bring your lightsaber vision to life without exceeding your $50 budget. Remember to prioritize safety when working with tools and electronics, and always consult online tutorials and guides for detailed instructions.

Crafting the Hilt: Design and Assembly Techniques
The hilt is the heart of your lightsaber, so it’s important to plan its design carefully. This is where your creativity can truly shine. Let’s explore some design considerations and assembly techniques:
Inspiration and Design
Before you start building, take some time to research different lightsaber hilt designs. Look at images from the Star Wars movies, comics, and video games. Consider the overall shape, size, and aesthetic you want to achieve. Sketch out your ideas on paper or use a digital design tool to visualize your creation.
Working with PVC
PVC pipe is an excellent material for building a lightsaber hilt due to its affordability, versatility, and ease of use. Here are some tips for working with PVC:
- Cutting: Use a saw or pipe cutter to cut the PVC to the desired length. Be sure to make clean, straight cuts for a professional look.
- Shaping: PVC can be heated and bent into different shapes using a heat gun or oven. Be careful not to overheat the PVC, as it can become brittle and crack.
- Joining: PVC pieces can be joined together using PVC cement or screws. For a cleaner look, consider using PVC cement, which creates a strong and permanent bond.
Adding Details and Texture
To make your lightsaber hilt truly unique, consider adding details and texture. Here are some ideas:
- Grips: Wrap the hilt with rubber or leather strips to create a comfortable and secure grip.
- Buttons and Switches: Add decorative buttons and switches to give your hilt a realistic look. Consider using old electronic components or crafting your own buttons from scrap materials.
- Weathering: Apply paint and sandpaper to create a weathered, battle-worn look. This can add character and depth to your lightsaber hilt.
Remember to prioritize safety when working with tools and materials. Wear safety glasses and gloves when cutting, sanding, and painting. Always work in a well-ventilated area when using PVC cement or paint.
The lightsaber hilt is a blank canvas for your creativity. With careful planning and attention to detail, you can create a hilt that is both functional and visually stunning.
Illuminating the Blade: LED Magic and Diffusion Techniques
The blade is what truly brings a lightsaber to life, and LEDs are the key to creating a convincing energy blade effect. Here’s how to harness the power of LEDs and diffusion techniques for a stunning lightsaber blade:
Choosing the Right LEDs
When selecting LEDs for your lightsaber blade, consider the following factors:
- Brightness: Choose LEDs that are bright enough to be visible in both indoor and outdoor lighting conditions.
- Color: Select a color that matches your desired lightsaber blade. Common colors include blue, green, red, and purple.
- Voltage: Ensure that the LEDs are compatible with your power source (batteries).
Wiring the LEDs
Once you’ve selected your LEDs, you’ll need to wire them together in a series or parallel circuit. A series circuit will increase the voltage, while a parallel circuit will increase the current. Consult online resources and tutorials for detailed wiring diagrams and instructions.
Diffusion Techniques
To create a smooth and uniform glow, you’ll need to diffuse the light from the LEDs. Here are some common diffusion techniques:
- Diffusion Film: Wrap the LED strip with diffusion film to soften the light and eliminate hotspots.
- Translucent Tubing: Use a polycarbonate or acrylic tube to house the LED strip. The translucent material will diffuse the light and create a glowing blade effect.
- Cotton Batting: Stuff the inside of the tube with cotton batting to further diffuse the light.
Creating a Realistic Blade Effect
To enhance the realism of your lightsaber blade, consider adding a flickering or pulsing effect. This can be achieved by using a microcontroller or a simple circuit with a capacitor and resistor. Experiment with different circuits and programming techniques to create the desired effect.
Working with LEDs and electronics can be challenging, but with patience and careful attention to detail, you can create a stunning lightsaber blade that will impress your friends and fellow Star Wars fans.
Powering Up: Electronics and Wiring for Durability
With the hilt crafted and the blade ready to glow, it’s time to wire up the electronics. Ensuring proper connections and robust build are key for a lasting lightsaber. What are the best practices for powering your creation and ensuring its longevity in 2025?
Selecting a Power Source
The battery pack will feed juice to the lightsaber. Some options are:
- AA or AAA Batteries: Common, simple, easy to swap out. Great for a quick start.
- Rechargeable Batteries: Offer longer use. Consider a USB-chargeable option for ease.
- Lithium-Ion (Li-Ion) Batteries: Power-dense, but be sure to use a protective circuit to keep them from overcharging.
The Importance of Resistors
LEDs can get fried if they get too much current. Resistors ensure lasting light:
- Calculating the Right Resistor: Use online calculators to get the best resistance based on input voltage and LED attributes.
- Wiring Resistors: Put the resistor in series with the LED to keep too much current flowing.
- Heat Management: Ensure resistors are well-placed so that heat isn’t near sensitive parts.
Wiring It All Together
Now for the real magic. A steady hand and clear connections are paramount:
- Soldering Fundamentals: Soldering grants the firmest link. If novice, consider using prototyping breadboards first.
- Wiring Diagram: Prior planning can save head-scratching later. Follow diagrams closely.
- Insulation: Shrink tubing will cover up connections.
An investment in better-quality parts and tools will pay off in the long run. With careful attention to detail, your DIY lightsaber can endure many galactic battles to come.
Customization and Personal Touches: Making It Your Own
Your DIY lightsaber is more than just a replica; it’s a statement piece. Now is the time to add those unique touches that reflect your style and fandom. How can you personalize your creation for maximum impact?
Hilt Design
What makes your lightsaber different?
- Paint Job: Metallics, battle-worn, and custom schemes are all fair fare.
- Grips and Wraps: Leather, fabric, and rubber can add great texture and aesthetic.
- Embellishments: Recycled parts, custom buttons, and engraved parts add authenticity.
Sound Effects
- Basic Soundboards: Get sound effects for swings, clashes, and the idle hum.
- Motion Sensors: These detect the swing and clash to trigger the sounds.
- Speaker Placement: The speaker needs to fit properly in the hilt without muffling the sound.
Blade Color
The blade color should resonate with your inner persona:
- RGB LEDs: Modify the color by adjusting brightness and mix.
- Filters: Filters colorize white LED light to get the required look.
- Color Psychology: Each color represents something. Blue for guardians, Red for power, Green for harmony.
Finishing Touches
- Engraving: Personalize with quotes or insignia.
- Display Stands: Create a stand to display your lightsaber.
- Documentation: Write down your assembly and customization steps.
Bring your singular lightsaber to life, with the personal details that make it shine even brighter.
| Key Aspect | Brief Description |
|---|---|
| 💡Hilt Materials | PVC pipes, plumbing fittings, and recycled materials offer inexpensive options. |
| ✨ Blade Illumination | LED strip lights and diffusion film create a glowing blade effect. |
| 🛠️ Essential Tools | Include cutting tools, sandpaper, soldering iron, and hot glue gun for assembly. |
| 🎨 Customization | Personalize with paint, grips, sound effects, and blade color options. |
[FAQ Section]
Frequently Asked Questions
▼
PVC pipes and plumbing fittings are excellent, cheap options. Also, think about recycling old tubes, pipes or containers into a hilt!
▼
Seek out bright LEDs. Strip LEDs are the best for equal radiance. Make sure they’re the color you want, usually green, blue, or red.
▼
Diffuse light with film wrapped on the LEDs, or set the LEDs within see-through tubing to spread their light all about.
▼
You’ll need a tool for cutting, sandpaper, for smoothening, a soldering iron, and a hot glue machine. Safety glasses/gloves are also a must.
▼
YouTube and other online DIY sites have great tutorials! Make sure to plan before you begin to get the best results.
Conclusion
Building your custom lightsaber for under $50 in 2025 is a very fun and inventive do-it-yourself project! Using simple materials, LED innovation, and custom design, you will possess an iconic weapon, and a testament to your innovative craftsmanship and geek passion.


