Retro Gaming Revival: Build Your Own Arcade Cabinet for Under $500
Bring the nostalgia of classic arcades into your home without breaking the bank by building a budget-friendly arcade cabinet for under $500, combining DIY skills with modern technology to relive iconic gaming experiences.
Relive the golden age of gaming with your own DIY project! The retro gaming revival: How to build a budget-friendly arcade cabinet for under $500 in your US home is more accessible than you might think. Get ready to transform your living room into a personal arcade haven.
Why Build Your Own Arcade Cabinet?
Building your own arcade cabinet provides a unique blend of customization and nostalgia. Not only does it offer a personalized gaming experience, but it also serves as a fun and rewarding DIY project. Let’s dive into why this is a great idea.
Cost-Effectiveness
Purchasing a pre-made arcade cabinet can be quite expensive. Building your own allows you to control costs by sourcing materials and components that fit your budget. You can easily stay under $500 with careful planning.
Personalization
A DIY arcade cabinet lets you customize everything from the cabinet’s design to the games it features. You can choose your favorite classic titles, add custom artwork, and even tailor the controls to your preferences.
The Fun of DIY
There’s a certain satisfaction that comes from building something with your own hands. Constructing an arcade cabinet is a challenging but rewarding project that offers a sense of accomplishment once completed.
- Control Over Design: Customize the size, shape, and aesthetics of your cabinet to match your home decor.
- Game Selection: Choose which games to include, ensuring your favorite titles are always at your fingertips.
- Skill Development: Learn valuable woodworking, electronics, and software skills.
- Unique Entertainment: Create a one-of-a-kind entertainment piece that’s sure to impress friends and family.
Building your own arcade cabinet is a fulfilling way to customize your gaming experience while saving money. It combines the thrill of gaming with the satisfaction of a hands-on project.
Planning and Design
The foundation of any successful arcade cabinet project lies in thorough planning and design. Before you start cutting wood or ordering parts, it’s crucial to map out your vision. Here’s what you need to consider.
Choosing a Design
Decide on the style and size of your arcade cabinet. Options range from upright cabinets resembling classic arcade machines to countertop designs that fit in smaller spaces. Consider the available space in your home and your design preferences.
Creating a Blueprint
Once you have a design in mind, create a detailed blueprint. This should include measurements, material lists, and component placements. There are many free and paid resources online that offer arcade cabinet blueprints.
Selecting Materials
Choose your materials based on factors like cost, durability, and ease of use. MDF (Medium Density Fiberboard) is a popular choice due to its affordability and workability. Plywood is another option, offering more strength but at a higher price.
Proper planning ensures a smooth building process, saving you time and resources. A well-thought-out design is key to creating an arcade cabinet that meets your needs and preferences.
Gathering Your Tools and Components
With your design in place, it’s time to gather the necessary tools and components. Having everything on hand before you start building will streamline the process and prevent unnecessary delays. Here’s a breakdown of what you’ll need.
Essential Tools
Equip yourself with a basic set of tools for woodworking and electronics. These tools will be essential for cutting, assembling, and wiring your arcade cabinet.
Core Components
The core components of your arcade cabinet include the monitor, controls, and the brains of the system. Selecting the right components ensures a smooth and enjoyable gaming experience.
Software and Emulators
To play classic arcade games, you’ll need the right software and emulators. These programs allow you to run ROMs (game files) on your system, bringing your favorite titles to life.
- Woodworking Tools: Circular saw, jigsaw, drill, sander, and measuring tape.
- Electronics Tools: Soldering iron, wire strippers, multimeter, and heat shrink tubing.
- Display: An old computer monitor or a new, budget-friendly LCD screen.
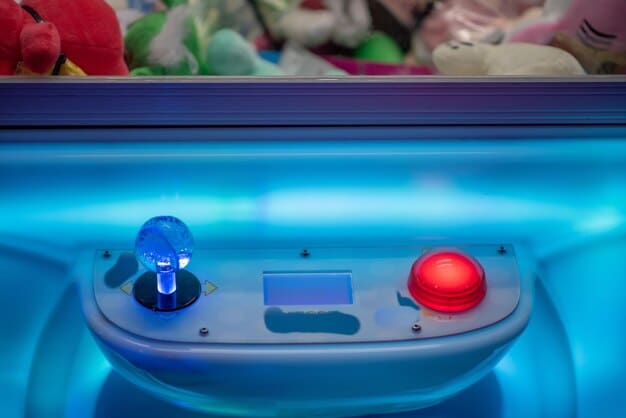
- Controls: Arcade-style joysticks and buttons.
- Single-Board Computer: Raspberry Pi or similar device to run the games.
Gathering the right tools and components is a critical step in building your arcade cabinet. Investing in quality parts and tools will ensure your project is both enjoyable and long-lasting.
Step-by-Step Cabinet Construction
Now it’s time to bring your blueprint to life. The construction phase involves cutting, assembling, and finishing the cabinet. Follow these steps to create a solid and visually appealing arcade cabinet.
Cutting the Wood
Using your blueprint as a guide, cut the MDF or plywood into the necessary shapes and sizes. Precision is key here, so take your time and double-check your measurements.
Assembling the Cabinet
Once the wood is cut, assemble the cabinet using screws, wood glue, and clamps. Ensure all joints are tight and secure for a sturdy structure.
Finishing Touches
With the cabinet assembled, it’s time to add the finishing touches. This includes sanding, painting, and applying artwork to give your arcade cabinet a professional look.
Constructing the cabinet is a hands-on process that requires patience and attention to detail. By following these steps, you can create a solid and visually appealing arcade cabinet that’s ready for gaming.
Installing the Electronics
The electronics are the heart of your arcade cabinet, bringing the games to life. Properly installing and wiring the components is crucial for a fully functional machine. Here’s how to do it.
Mounting the Monitor
Securely mount the monitor inside the cabinet. Ensure it is centered and at a comfortable viewing angle. Use brackets or a custom-built frame for stability.
Wiring the Controls
Connect the joysticks and buttons to the single-board computer using a USB encoder. Follow the wiring diagram provided with the encoder for correct connections.
Setting Up the Software
Install the operating system and emulators on the Raspberry Pi or other single-board computer. Configure the software to recognize the controls and display the games correctly.
Installing the electronics transforms your cabinet into a fully functional arcade machine. Careful wiring and proper software setup will ensure a seamless and enjoyable gaming experience.
Customization and Final Touches
The final stage is all about adding personal touches and ensuring everything functions perfectly. Customization can make your arcade cabinet truly unique and stand out.
Adding Artwork
Apply custom artwork to the cabinet to give it a classic arcade look. You can design your own artwork or use pre-made templates available online. Print the artwork on adhesive vinyl for easy application.
Installing Lighting
Incorporate LED lighting to make your arcade cabinet more visually appealing. Add lights around the marquee, buttons, or along the edges of the cabinet for a vibrant effect.
Testing and Troubleshooting
Once everything is assembled, thoroughly test the arcade cabinet. Check all controls, monitor display, and sound. Troubleshoot any issues to ensure a smooth gaming experience.
| Key Point | Brief Description |
|---|---|
| 🔨 DIY Benefits | Cost-effective, personalized gaming experience. |
| 📐 Planning Stage | Design selection and blueprint creation are crucial. |
| 🕹️ Core Components | Monitor, controls, and Raspberry Pi are essential. |
| 🎨 Customization | Artwork and LED lighting enhance visual appeal. |
Frequently Asked Questions (FAQ)
▼
MDF (Medium Density Fiberboard) is cost-effective and easy to work with, while plywood offers more durability. Choose based on your budget and woodworking skills.
▼
Use recycled materials, shop for discounted parts, and opt for a used monitor. Planning and budgeting are key to staying within your limit.
▼
The Raspberry Pi 4 is a popular choice due to its affordability and compatibility with many emulators. It offers sufficient power for most retro games.
▼
Install an emulator like RetroPie on your single-board computer. Load ROMs (game files) into the appropriate folders, and configure the controls through the emulator’s menu.
▼
Many websites offer free and paid arcade cabinet blueprints. Search online forums, DIY communities, and specialized websites for a variety of design options.
Conclusion
Building your own arcade cabinet is a rewarding project that blends DIY skills with a passion for retro gaming. By following these steps and customizing your cabinet to your preferences, you can create a unique and budget-friendly gaming experience right in your home.


